This article is available in French and Bahasa Indonesia.
This article aims to run a Squid Proxy Server and forward all traffic to the Cloudflare WARP Client. This can be convenient if you do not want to install WARP Client on multiple devices or on a device that doesn’t support the WARP client.
To get started, ensure you have an active internet connection and the latest version of Ubuntu Server. In this article, we will be using Ubuntu 22.04 (Jammy Jellyfish).
Installing Cloudflare WARP Client
The first step is to install Cloudflare WARP Client. To do this, you will have to paste in the commands below. (You may also refer to the official cloudflare instructions here.)
Adding cloudflare repository GPG Keys
curl https://pkg.cloudflareclient.com/pubkey.gpg | sudo gpg --yes --dearmor --output /usr/share/keyrings/cloudflare-warp-archive-keyring.gpgadding repository to apT
echo "deb [arch=amd64 signed-by=/usr/share/keyrings/cloudflare-warp-archive-keyring.gpg] https://pkg.cloudflareclient.com/ $(lsb_release -cs) main" | sudo tee /etc/apt/sources.list.d/cloudflare-client.listupdating APT cache
sudo apt updateinstalling warp client
sudo apt install cloudflare-warpAfter install, we have to set the WARP Client in proxy mode
Setting Cloudflare WARP to Proxy Mode
To do this, first you’ll have to register the client by accepting Cloudflare’s Terms of Service and Privacy Policy.
warp-cli register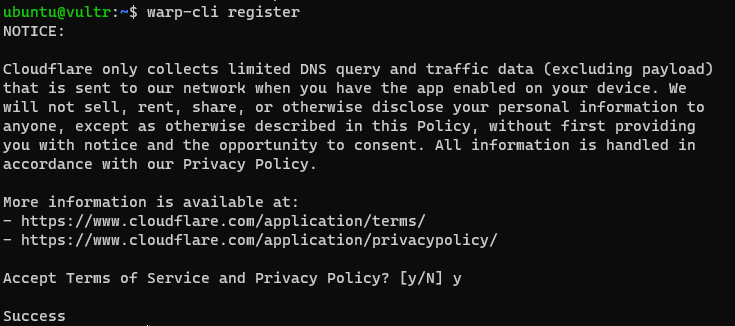
After accepting the terms, you can now set the client mode to proxy. To do this, execute the following command.
warp-cli set-mode proxy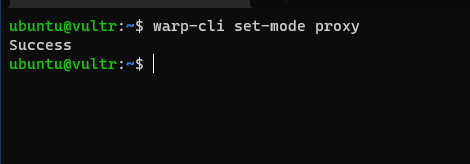
changing proxy port
You may change the port on which Cloudflare proxy runs by running the following command, where the number at the end is the port in which the proxy is listening to. Keep a note of this as we will need this later.
warp-cli set-proxy-port 5423
connecting cloudflare client
You can now connect to the Cloudflare network by using the following command.
warp-cli connect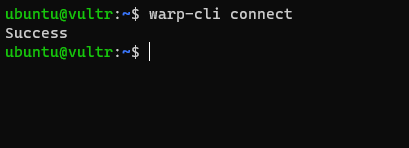
checking connection status (optional)
warp-cli warp-stats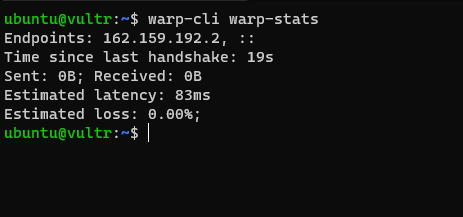
Installing Squid Proxy
Now that you have configured Cloudflare WARP, we can install Squid Proxy.
sudo apt install squidAfter install, we can navigate to the Squid configuration directory to start editing files.
cd /etc/squidEditing Squid Configuration files
Using your favorite, text editor, edit the squid.conf file in the directory (you need to be superuser to edit the files). For convenience, I will be using nano.
sudo nano squid.confYou will have to add these line at the top of the file.
changing the port squid runs on (optional)
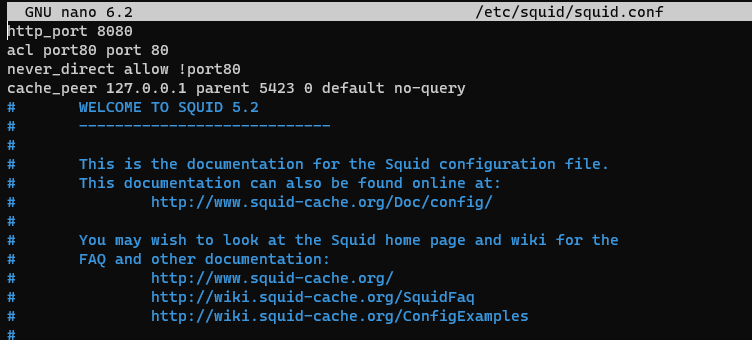
http_port 8080This code makes Squid run on port 8080.
adding port 80 acl
acl port80 port 80We need to specify port 80 for our next command
preventing traffic which is not on port 80 from being forwarded to origin
never_direct allow !port80This code essentially forwards all traffic which is not on port 80 to the proxy.
Note: Traffic on port 80 does not go well with Cloudflare proxy.
Adding cloudflare proxy
cache_peer 127.0.0.1 parent 5423 0 default no-queryThis code adds the WARP client running on port 5423 as a cache peer.
Finally, the code should be looking like this.
Save and exit nano by CTRL + X and then by clicking Y.
Restart Squid Proxy
Now that the changes are done, you can restart squid proxy to apply your changes.
sudo systemctl restart squidTesting the connections
After the restart, we can test if squid is successfully forwarding the connections to Cloudflare WARP by using the following curl command.
curl -x http://localhost:8080 https://cloudflare.com/cdn-cgi/trace | grep warpAfter executing the command, if you get warp=on then squid is successfully forwarding your requests to cloudflare.
