This article aims to use domain-based proxy selection on Squid proxy, which allows you to choose a different proxy depending on the domain that is being accessed—for eg, accessing all .de domains from a German Proxy server or accessing google.com through Proxy A and google.de through Proxy B. Please ensure you understand what you’re doing before proceeding with the article.
To get started, ensure you have an active internet connection and the latest version of Ubuntu Server. In this article, we will be using Ubuntu 22.04 (Jammy Jellyfish).
For reference for this article, we set up 3 Linode servers across Europe and Asia, where the main one (which routes all the traffic) is in Mumbai, India.
Installing Squid
Note: You may skip this step if you already have Squid installed.
sudo apt install squidCreating text files with domain list
First, make a text file in the Squid configuration directory, with any name you like. In this article, we are using via_de.txt (which is an abbreviation for domains that will be using German Proxy).
sudo nano /etc/squid/via_de.txtAdd domains that will use the German proxy
Add domains, one on each line. If you want to redirect entire domain extensions, like .com/.net/.de just add the extension with a dot at the start.
# If you want to use specific domains
.google.com
.microsoft.com

# If you want entire domain extension to go through the proxy
.net
.de
Save and exit.
Now, make a second file that will contain the domains whose traffic will go through the second proxy. In this example, the traffic is going through the UK.
sudo nano /etc/squid/via_uk.txtadd domains that will use the UK proxy
.org
.app

.ipinfo.io
Save and exit.
Editing Squid Configuration
Editing conf file
On Ubuntu, the squid configuration file is located at /etc/squid/squid.conf . You may use your own favorite text editor to edit the file.
sudo nano /etc/squid/squid.confAdding domain files
We have to add the text files to the Squid configuration. To do that, we use the acl (Access List) directive. You may learn more about this here.
The format for adding a new ACL is:
acl aclname acltype "file" ...Add the following code below. Make sure to change the filename to the one you used and use an absolute file path.
acl via_de dstdomain '/etc/squid/via_de.txt'
acl via_uk dstdomain '/etc/squid/via_uk.txt'
adding cache peer
The method we use involves adding the other Squid proxy as a cache peer. You may read more about this on official Squid documentation.
The format for adding cache peer is:
cache_peer hostname type http-port icp-port [options]Add the code below, after changing the IP Address/Hostname and the port. Include your login after no-query if your proxy requires authentication. You may read more on adding authentication here.
cache_peer via-de.local parent 8080 0 default no-query
cache_peer via-uk.local parent 8080 0 default no-query
specifying the cache access directive
Now, we need to add the domains that will use the specified proxy. To do this, we will have to use cache_peer_access directive. More about this is available here.
The format for adding cache peer access is:
cache_peer_access peer-name allow|deny [!]aclname ...Add the code below, after changing the peer name (IP Address or Hostname) and the ACL name.
cache_peer_access via-de.local allow via_de
cache_peer_access via-uk.local allow via_uk
allowing domains not in the file list to be accessible
This is an optional step but is better if done. The code below tells the squid proxy that we allow the domains, not in the file list to connect without a proxy. You can omit this if you want only the domains in the text list accessible.
Note: You may run a second instance of squid in docker or follow the steps below.
Firstly, you have to make a second squid configuration file, without the current cache peer stuff and change the HTTP port to a different port; Additionally, you also have to provide a second PID. Example below:
http_port 8080
pid_filename /var/run/squid2.pid
Then, you can run the following command to start the second squid proxy. This code sends the process to the background but, you can write your own systemd script too.
sudo squid -f /etc/squid/squid2.confNow, you have to specify this in the cache_peer and cache_peer_access directive. Make sure the change port below to the one on your second squid proxy.
cache_peer localhost parent 8080 0 default no-query
cache_peer_access localhost allow !via_de
cache_peer_access localhost allow !via_uk
prevent domains in the list from being accessed without proxy
We have to add the code below to prevent domains in the list of our files from being accessed without a proxy.
never_direct allow allFinishing up
Finally, your squid.conf file should look like this, after adding all the above configurations.
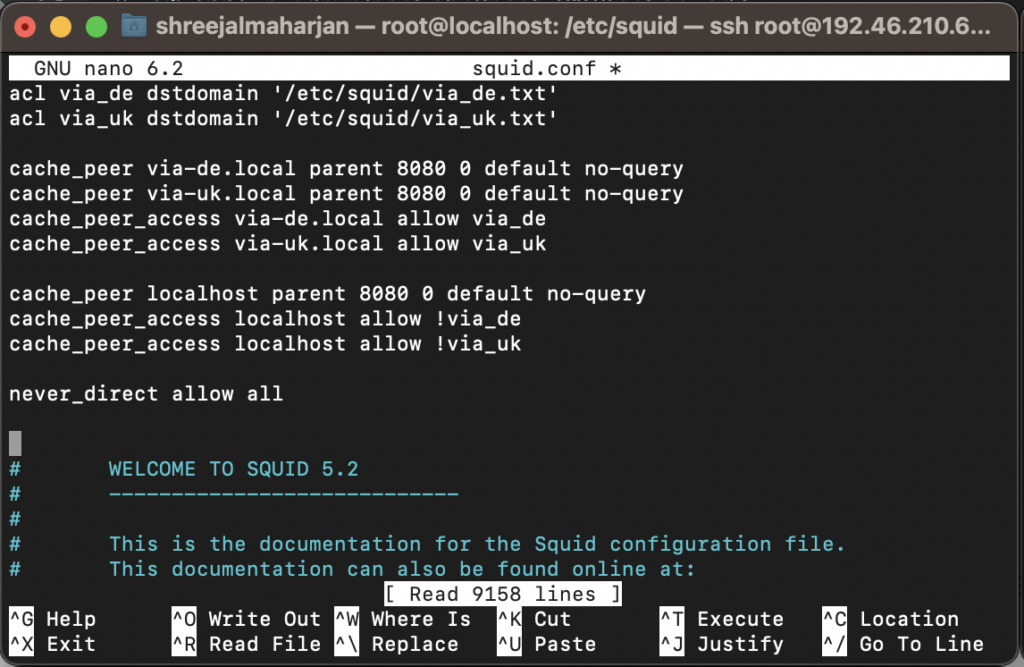
You may add more cache_peer and ACLs according to your needs 🙂
Now, you can restart the squid process using the following command.
sudo systemctl restart squidTesting out our proxy
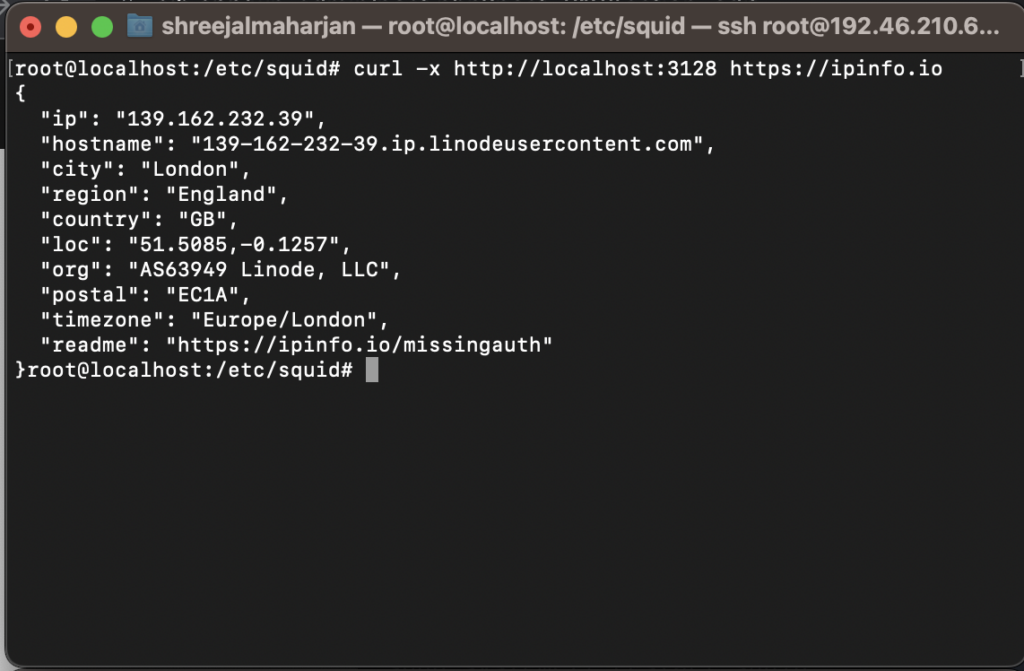
Now, if your configurations are correct, it should restart successfully. We can now test out if our proxy requests are being forwarded. In my example, I use cURL.
Test 1: Connecting to ipinfo.io through the UK proxy.
Test 2: Connecting to ipinfo.io through the German Proxy
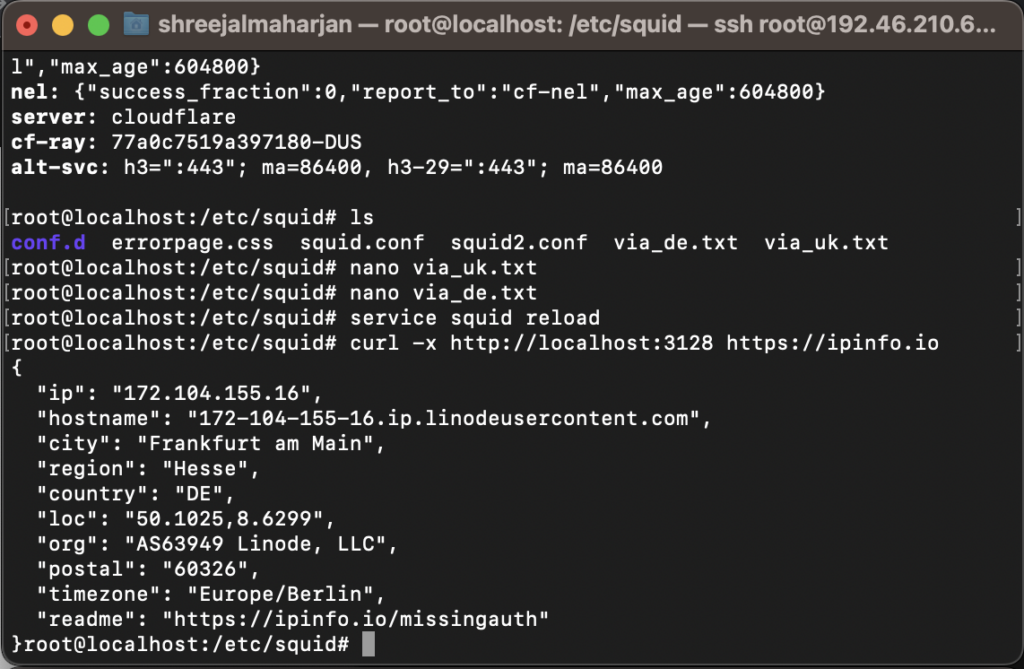
We can finally conclude that the proxy is working successfully. You may even add Cloudflare WARP on the other proxies if you’d like. You may learn to do that in our other article.